1. Introduction: The “Fit Frustration” Solver
There is nothing more frustrating than ordering a pair of pants online, certain they will fit, only to find the sizing is completely off. The biggest culprit? “Vanity Sizing.” This practice means your supposed 32-inch waist in one brand can suddenly become a tight 34-inch fit in another, leading to endless returns and wasted time. This inconsistency makes relying on the label alone a gamble.
To eliminate this guesswork and ensure a perfect fit every time, you need reliable measurements. Forget the arbitrary numbers on the tag and start trusting the tape measure.
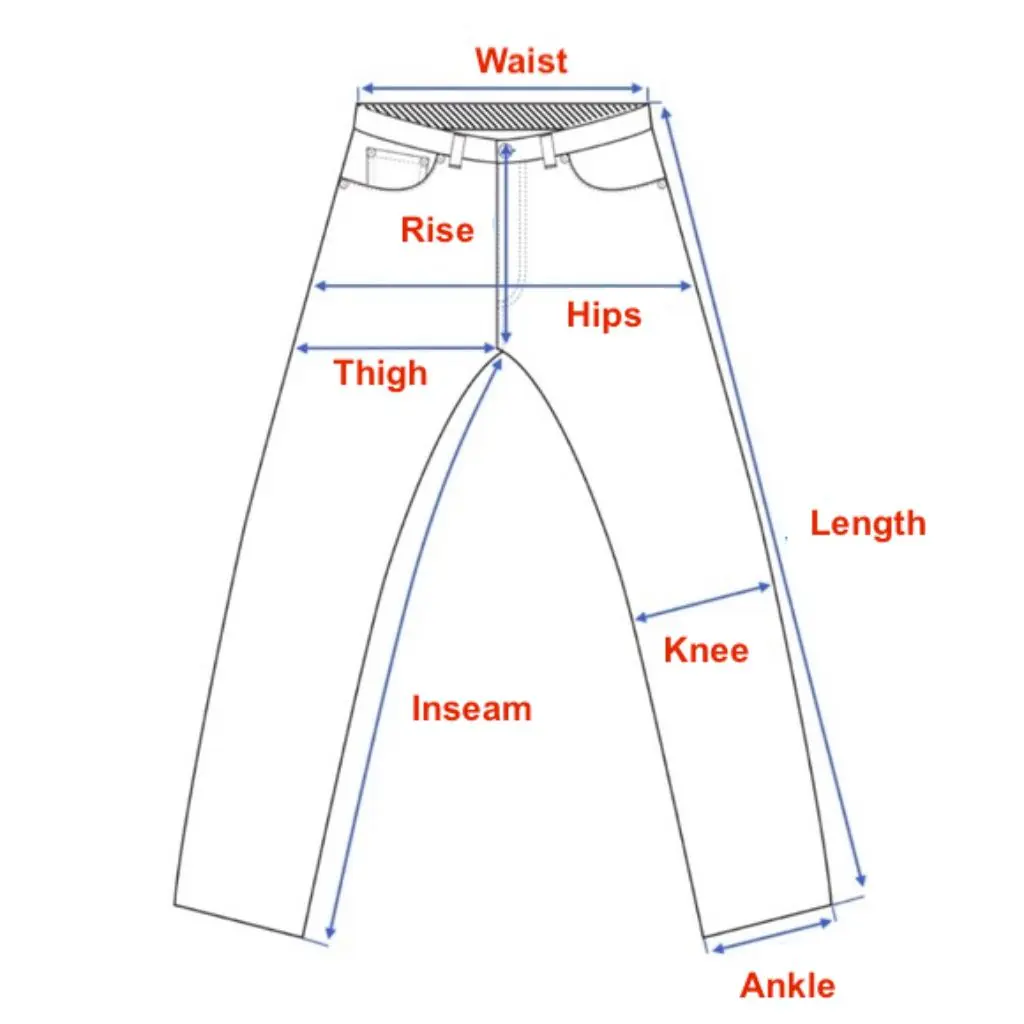
To measure pant size accurately, you need three core numbers: Waist (measuring the circumference of your natural waist), Hips (measuring around the fullest part of your seat), and Inseam (measuring from the crotch down to the ankle). For the best results, use a soft, flexible tape measure and stand naturally without sucking in your stomach. This guide will walk you through the essential steps to master your true size.
2. The Two Methods: Body vs. Garment Measurements
Before grabbing the tape measure, it’s crucial to understand that there isn’t just one standard way to determine your size. Achieving the perfect fit often requires understanding the distinction between your actual body size and the finished measurements of the clothing.
Professional tailors and savvy online shoppers utilize two distinct approaches depending on their goal. Knowing which one to use is the first step toward accuracy.
Method A: Measuring Your Actual Body Dimensions
This is the foundational approach. It involves using a soft tape measure directly against your skin or very thin undergarments to get your “raw” numbers.
- Best For: Custom tailoring or consulting a brand’s general “Size Guide” chart.
- Why Use It: When a brand provides a chart saying “Size Large = 34-36 inch waist,” they are referring to your body measurement, not the pants’ measurement. This method gives you your true base numbers to compare against these generic charts.
External Resources:
For more tips on how to accurately measure your body, refer to Levi’s Size Guide or Indochino Measurement Guide. These resources provide detailed charts and video tutorials to help you take accurate measurements and avoid common mistakes.
Method B: Measuring a Well-Fitting Pair (The “Flat Lay” Method)
This is often the most practical, yet overlooked, method for modern shopping. Instead of measuring yourself, you take a pair of pants you currently own that fit you perfectly, lay them flat, and measure the garment itself.
Why Use It: This is your secret weapon against vanity sizing. If you know your favorite jeans measure exactly 17 inches across the waist when laid flat (a 34-inch circumference), you can look for online listings that specify the same garment dimensions, completely bypassing the confusing numbers on the tag.
Best For: Buying online and comparing specific product dimensions.
3. Step-by-Step: Measuring Your Body (The Standard Way)
Measuring your body accurately is the foundation for finding pants that fit correctly, especially when using general size charts or ordering custom clothing.
To ensure precision, use a soft, flexible tape measure. Stand straight in a relaxed posture in front of a mirror. Do not suck in your stomach, as this will lead to ordering pants that are too tight.
Here is how to take the four most critical measurements:
Step 1: The Waist (Natural vs. Where You Wear Them)
It is vital to distinguish between your body’s natural waist and where you actually prefer your pants to sit.
- Natural Waist: This is typically the narrowest part of your torso, located just above your belly button.
- Preferred Waistband Position: Depending on the style (e.g., low-rise jeans), you might wear your pants lower, closer to your hips.
For the best results: If you are buying high-waisted trousers, measure your natural waist. For most other styles, wrap the tape measure around the part of your torso where you want the waistband of the new pants to rest. Keep the tape snug but not tight enough to dig into your skin.
Step 2: The Hips (Crucial for Curvy Fits)
This measurement is often missed but is essential for achieving a good fit through the seat and thighs, particularly for women or anyone with a curvier build.
To measure correctly, stand with your feet together. Wrap the tape around the fullest, widest part of your hips and glutes. This point is usually about 8 to 10 inches below your natural waistline.
Important: Ensure the tape measure stays level and parallel to the floor all the way around. If the tape dips down in the back, your measurement will be inaccurate.
Step 3: The Rise (The Forgotten Metric)
The “Rise” is often overlooked, yet it is the deciding factor in whether pants are defined as high-waisted, mid-rise, or low-rise. It dictates where the waistband will sit on your body.
You need to understand two distinct parts of the rise:
- Front Rise: The distance from the center crotch seam straight up to the top of the front waistband.
- Back Rise: The distance from the center crotch seam curving up to the top of the back waistband. The back rise is almost always longer to accommodate the curve of your buttocks.
Knowing these numbers helps you predict if a pair of pants will cut in unfine-comfortably or gap at the back.
Step 4: The Inseam (Leg Length)
The inseam is the length of the leg from the crotch down to the ankle hem. It determines if the pants will be too long (dragging on the floor) or too short (looking like high-waters).
The Golden Rule for Measuring Inseam: Do not try to measure your own inseam while wearing pants. Bending over to read the tape measure distorts your body shape and will result in an inaccurate, shorter reading.
Instead, use one of these two reliable methods:
Use existing pants: It is often easier and more accurate to measure the inseam of a pair of pants you already own that are the perfect length. (We will cover this “flat lay” technique in the next section).
Ask for help: Stand straight and have a friend measure from the top of your inner leg (at the crotch) down to where you want the pants to end (usually just below the ankle bone).
4. The “Flat Lay” Method: How to Measure Your Best Pants
This method is arguably the most practical strategy for online shopping. Instead of measuring your shifting body, you measure a tangible object that you already know fits perfectly. This gives you concrete “garment measurements” to compare against specific product listings online.
Preparation: Find your best-fitting pair of pants. They shouldn’t be freshly washed (as they might be temporarily shrunk) nor worn for five days straight (as they might be stretched out). Close the button and zipper fully.
Here is how to get accurate flat measurements:
Step 1: The Flat Lay Waist
This is where many people make a critical mistake. You cannot simply measure straight across the top.
- Lay the pants flat on a hard surface like a table.
- Smooth them out completely to ensure there are no wrinkles.
- Notice how the front of the waistband likely sits slightly lower than the back? This is called the “waistband dip.”
- To get an accurate measure, pull the front waistband up so it aligns perfectly even with the back waistband. The top line should be completely straight.
- Measure straight across the top from edge to edge.
- The Calculation: Take that number and multiply it by 2. For example, if the flat measurement is 17 inches, the waistband circumference is 34 inches.
Step 2: The Flat Hips
Unlike the waist, you don’t measure this at the very edge.
- Keep the pants lying flat.
- Locate the bottom of the zipper fly or the “bar tack” stitches that reinforce the bottom of front pockets. This area is usually the widest part of the pants.
- Measure straight across the pants from side seam to side seam at this level.
- The Calculation: Just like the waist, multiply this number by 2 to get the total hip circumference.
Step 3: The Flat Inseam
This is the easiest and most accurate way to determine your leg length requirement.
- Lift one leg of the pants up and lay it out flat, ensuring the inseam (the inner leg seam) is completely straight without wrinkles.
- Place the start of your tape measure at the exact point where the front and back crotch seams meet in the middle.
- Measure all the way down the seam to the very bottom edge of the leg opening (the hem).
- This measurement is your inseam length; no multiplication is needed.
5. Men vs. Women: Key Differences in Sizing
While the measuring techniques remain the same, the interpretation of those measurements differs significantly between men’s and women’s clothing. Understanding these structural differences is key to navigating size charts correctly.
The primary difference boils down to body shape ratios: men’s sizing is typically straighter, while women’s sizing must account for more significant curves between the waist and hips.
Men’s Sizing: The “Golden Ratio” of Waist + Inseam
Men’s pant sizing is generally more straightforward and functional. It almost exclusively focuses on two key numbers, often presented in a format like 34×32.
- The First Number (e.g., 34): This is theoretically the waist measurement in inches. (However, due to vanity sizing, always rely on your actual measurement rather than the tag number).
- The Second Number (e.g., 32): This is the inseam length in inches.
For most men’s styles, the hip measurement is secondary. The assumption in manufacturing is a relatively standard, straighter “drop” from waist to hip. If you get the waist and length right, the rest usually falls into place, unless you have particularly athletic thighs or glutes, in which case checking specific “thigh” or “seat” measurements becomes necessary.
Women’s Sizing: The Critical Role of the Hip-to-Waist Ratio
Women’s sizing is notoriously more complex and inconsistent because it must accommodate a much wider variety of body shapes (e.g., hourglass, pear, straight). Therefore, relying on a single number (like a size 8 or 10) is rarely accurate.
For women, the relationship between the waist and hip measurements is paramount.
- Focus on Waist + Hips: Unlike men’s sizing, you cannot ignore the hip measurement. Two women could both have a 28-inch waist, but if one has 36-inch hips and the other has 40-inch hips, they will likely need entirely different sizes or even different cuts of pants.
- Curvy vs. Straight (Standard) Fits: This is the industry’s solution to different ratios.
- Straight/Standard Fit: Designed for bodies with a smaller difference (usually less than 10 inches) between the waist and hip measurement.
- Curvy Fit: Specifically engineered for a larger hip-to-waist ratio (often a 10-13+ inch difference). These pants have more room in the seat and thighs while keeping the waistband smaller to prevent the dreaded “waist gap” at the back.
Key Takeaway: For women, your hip measurement often dictates the numerical size you should select to ensure the pants fit over your widest part. You then look for a cut (Curvy or Standard) that matches your waistline.
6. Decoding the Size Charts: The Truth About the Numbers
Armed with your accurate body or garment measurements, you are ready to face the most confusing part of buying pants: the size chart. It’s crucial to understand that the number on the tag is often more of a marketing tool than a precise measurement.
The “Vanity Sizing” Truth
Have you ever wondered why you fit into a size 32 in one brand but need a 34 in another? Welcome to the frustrating world of vanity sizing.
Vanity sizing is a common industry practice where clothing manufacturers label garments with smaller sizes than their actual measurements. The psychological goal is to make customers feel better about fitting into a smaller size, encouraging them to make a purchase.
The Reality Check: A pair of men’s jeans labeled with a “32 waist” almost never measures exactly 32 inches. In reality, the waistband might actually measure 33.5 or even 34.5 inches.
This is why your actual body measurement is so important. If your natural waist measures 34 inches, don’t automatically buy a size 34 pant. You might actually need to buy a size “32” or “33” depending on how severely that specific brand uses vanity sizing.
The Rule: Always ignore the tag size number and look immediately for the brand’s “Size Guide” link, which lists the corresponding body measurements in inches or centimeters.
Alpha vs. Numeric Sizing: Knowing the Difference
Another layer of confusion comes from the two different systems brands use to label sizes. Understanding which one you are looking at is key to assessing fit accuracy.
| Feature | Numeric Sizing (e.g., 30, 32, 34) | Alpha Sizing (e.g., S, M, L) |
|---|---|---|
| Common Use | Jeans, trousers, tailored clothing. Most common in menswear. | Joggers, sweatpants, leggings, activewear, some casual trousers. |
| Precision | Higher Precision. Usually offers size increments every 1 or 2 inches (e.g., 32, 33, 34), allowing for a more exact fit. | Lower Precision. Covers a broad range of measurements under one umbrella size. |
| How it Works | The number theoretically corresponds to a waist measurement (subject to vanity sizing). | A “Medium” might cover waists from 32″ to 35″, relying on stretchy fabrics or drawstrings to accommodate the range. |
| Best Strategy | Compare your exact waist measurement to the brand’s chart for that specific number. | If you are between sizes on their chart, consider how tight or loose you want the fit, or look for customer reviews on sizing. |
In Summary: Numeric sizing generally offers a more tailored, precise fit, while alpha sizing is designed for garments with more flexibility and forgiveness.
7. FAQ: Common Questions About Measuring Pant Size
Here are quick answers to the most frequently asked questions about finding the right pant fit.
How do I measure my pant size without a tape measure?
You can use the “string and ruler” method. Find a piece of non-stretchy string, ribbon, or a phone cable. Wrap it around the body part you need to measure and mark the overlap point with your finger. Then, lay the string flat against a standard stiff ruler or metal measuring tape to get the length in inches or centimeters.
Is pant size determined by waist or hips?
It depends on your body shape, but you generally need both. For most men, the waist measurement is the primary factor. For most women, the hip measurement is the crucial deciding factor, as the pants must fit over the widest part of the body first; you then find a cut that accommodates your waist.
What is the difference between inseam and outseam?
The inseam is the length of the inner leg seam, measured from the crotch down to the hem; it determines if the pants are the correct length for your legs. The outseam is the total length of the pants along the outer edge, measured from the top of the waistband down to the hem.
Should I measure my waist standing or sitting?
You should always measure your waist while standing in a natural, relaxed posture. Sitting down can cause your midsection to expand or fold, leading to an inaccurate measurement that is larger than your actual size.
How do I measure the “rise” of a pair of pants?
Lay your best-fitting pants flat. To find the front rise, measure from the center crotch seam straight up to the top edge of the front waistband. To find the back rise, measure from that same crotch seam following the curve up to the top edge of the back waistband.
8. Conclusion: Trust the Tape, Not the Tag
Mastering the skill of accurate pant measurement is the most effective way to eliminate the frustration of online apparel shopping. You now possess the tools to calculate your essential dimensions—Waist, Hips, Rise, and Inseam—using both body and garment methods.
However, the final piece of advice is the most critical: Do not rely on the labeled size alone. Due to the industry practice of Vanity Sizing (where brands intentionally label sizes smaller than their true measurements), the number on the tag is often inaccurate. Always use your calculated numbers to cross-reference with the brand’s specific Size Guide and measurement charts before placing an order. By trusting your tape measure, you ensure a perfect fit, reduce returns, and shop with confidence.
If you’re looking for a reliable partner to help with wholesale sourcing and shipping, SoSourcing is here to assist. We handle everything from finding the best suppliers to managing logistics, ensuring a smooth and efficient process every step of the way.